Demoscene Basics from a Basic Demoscener
Hey there! Ever watched a demo or Revision and thought, I want to try making one of those? Cool!
Most ‘getting started’ guides about the demoscene either don’t dive into the technical side more than a mention, or jump straight into installing OpenGL and DirectX and assume you already know a fair bit of the basic trig and math used for demos. This guide tries to hit a decent middle-ground.
Today, it’s not that hard to get started writing demo effects, and stringing them into a full demo. In this guide we start off with some simple platforms that just let you get creating – start moving pixels on the screen, getting beeps and bloops through your headphones, and actually ending up with a demo that other people can run.
Optimally, you should know a bit of programming before you dive into this. I try to take it slow but knowing what functions, variables, and just what code generally looks like will definitely be useful.
My name’s Daniel, or pixienop. If you have any questions, issues, or just wanna say hi, feel free to DM me! I’ve made one demo so far with another one in the works, so I know how intimidating just getting started can be. Hope this guide’s useful!
Note: This is very much a work-in-progress. When writing a guide like this, it’s also hard to see whether you’re being too simple or too complicated as you write the different sections. If you have any feedback, please DM me~
Sections
| Introduction |
Introduces demos and the demoscene |
| PICO-8 |
Introduces the Pico-8 platform and why we'll be using it |
| Writing and Running Cartridges |
Goes through the Pico-8 interface |
| Initial Exercises |
Goes through using the |
| Pico-8 Scroller |
Creating a text scroller with a repeating colour pattern! |
| Pico-8 Plasma |
Creating a plasma effect! |
Intro(duction)
Making demos is a creative process. Whether it’s choosing which effects to include, making graphics, working out how you want your demo to flow, or composing the music, making demos takes creative energy and ideas.
You can get ideas and recharge your creativity in a lot of different ways. The Revision YouTube channel always has some cool compo videos for you to look through – and Annikras has a bunch more uploaded. Even look outside the scene, go listen to some music or watch a movie that looks cool, or whatever else gets you going. Get yourself excited to learn and start creating, however works best for you!
If you haven’t aready, learning the ropes, the roles and the words that people use in the scene is good. Lets you know what other people mean when they talk about ‘trackers’ or a ‘demoparty’. ps has a really great guide for this here, which you should check out.
And with all that out of the way, let’s get started with a tool!
PICO-8
This is the first platform we’ll try out. Pico-8 is one of many ‘fantasy consoles’. A Fantasy Console is a constrained software platform with integrated development tools – that is, a small piece of software that includes a code editor, music editor, etc, and lets you run your creations!
Now, PICO-8 isn’t free or open source, but the developer pretty actively supports the scene, it’s an absolutely adorable little platform, and it’s a really tightly-designed and clean system. I’ll try to include alternative code to run on other FCs as well (open to other contributions here, just throw me some running code~).
Writing and Running Cartridges
When you first boot up Pico-8, you’re dumped at a ‘terminal’, which looks like this:
The terminal lets you load, save, and run cartridges (P8’s name for programs), you can reboot the system, and boot the explorer system called splore. If you’d like to see the full list, check out the P8 manual or type help.
Here’s a quick list of useful commands:
reboot: Restart the system, get back to scratch without saving anything.load <filename>: Load the given cartridge.save [filename]: Save as the given cart.run: Run the current cartridge (the current code, gfx, map, sfx, and music).splore: Start the Pico-8 explorer, which lets you run carts from the internet.
To enter the development interface, press Escape. You should see something like this show up:
The buttons in the top-right introduce the different tools. From left to right, they are the:
- Code Editor: You write your code here.
- Sprite Editor: You make your graphics and tiles here.
- Map Editor: You can use tiles to lay out maps here.
- SFX Editor: You can make sound effects and music tracks here.
- Music Editor: You can arrange music tracks into full pieces of music here.
Let’s stick with the code editor for now. To get some code into your cart, just type in the window.
Initial Exercises
For now, let’s just change the background colour. Type this in the code editor:
cls(8)
The cls function clears the screen, and the 8 means red. If you go to the sprite editor and hover over the different colours, in the bottom bar you can see their numbers.
Just type the above into the sprite editor (or copy and paste it), then press Escape to go to the prompt, type run and hit Enter! You should see something like this:
And we’ve got a red background! The cart exits back to the prompt right away, though. As an alternative, the rectfill function also lets you do this (but might be a bit slower).
It’s definitely worth looking at the API and the Pico-8 Manual to see the functions that you can use in your code. I’m always referring back to those two, really nice references.
Pico-8 also has a function called time() that returns how many seconds have gone past since the system booted. Let’s try to do something interesting with this!
function _draw()
  cls(1)             -- clear the screen to dark blue
  local st = time()  -- 'st' means 'scene time'

  rectfill(st, st, 128-st, 128-st, 8)  -- draw a red rectangle in the middle of the screen
end
The _draw function is a special one to Pico-8. If you make it, the code inside gets run 30 times every second (if we didn’t have the _draw function, it would just happen once and then exit).
The variable st just holds the current time. I tend to think of demos in terms of ‘scenes’, with ‘scene time’ being ‘how many seconds have elapsed since the scene started’. Being consistent with names like this can help you bring your effects into a full demo later on.
The rectfill function just draws a filled rectangle in the given colour.
This example just draws a red rectangle in the middle of the screen, that gets smaller and smaller as time goes:
Once you’ve seen enough of it, press Escape to go back to the prompt. And then Escape again to go between the code editor and the prompt.
Being able to modify the position, size, or shape of something based on the time is really important in making cool demos. Next, we’ll go over some different ways of using the time!
We have time, a number that just keeps on going up. It’s really the only number we can use to make things move. We need to take that ever-increasing number and do some more interesting things with it – have things move up and down, left and right, or even in circles!
Knowing how to modify the time to suit your needs is really important when you’re working out effects. The main way to do that is through things called “wave functions”. For us, a wave function is a function that takes an input and makes a repeating output patten.
If you’re familiar with some math, you might recognise sin and cos as two wave functions. We’ll try them out here!
First, let’s just draw a circle in the middle of our screen as a basic starter.
function _draw()
  st = time()  -- st == scene time
  cls(1)       -- clear the screen to dark blue

  circ(64, 64, 10, 8)  -- draw a red circle in the middle of the screen
end
From now on, we’ll keep defining st at the start of our examples, to keep things consistent. We’ll also keep clearing the screen, unless we need to do something different for a specific effect.
You should see a circle in the middle of the screen:
Awesome! Let’s get that round boi moving.
Now, we can’t just plug st into sin or cos and use that. Since those two functions output between -1 and 1, our circle wouldn’t move that far at all. So we’ll make it more obvious:
function _draw()
  st = time()  -- st == scene time
  cls(1)       -- clear the screen to dark blue

  circ(64 + sin(st)*10, 64, 10, 8)  -- draw a red circle
end
The 64 + sin(st)*10 is what causes the moving here. An X of 64 is the middle of the screen, the sin(st) means that every second, sin will output between -1 and 1, and then the *10 will boost sin’s output to -10 to 10:
Really cool! Y always stays at 64, but X shifts between 54 and 74 because of the sin.
Using cos produces basically the same as sin, but shifted by half a second or so. On its own this doesn’t seem too interesting, two functions that basically do the same thing. But because of the shift, if you mix them together by using one for X and one for Y, you get something very different:
function _draw()
  st = time()  -- st == scene time
  cls(1)       -- clear the screen to dark blue

  circ(64 + sin(st)*10, 64 + cos(st)*10, 10, 8)  -- draw a red circle
end
Both X and Y use the same form, but one uses sin and the other uses cos. Beause of that, the circle rotates in a circle around the screen:
By changing the *10 to something else for one or both of X and Y, you can get all sorts of different rotations. Modifying st can also give you some interesting output, for example sin(st*0.25) means make st run at 25% speed for the sin function.
This is a very small change, but looks much closer to the sort of movements seen in normal demos:
function _draw()
  st = time()  -- st == scene time
  cls(1)       -- clear the screen to dark blue

  circ(64 + sin(st*0.35)*30, 64 + cos(st)*20, 10, 8)  -- draw a red circle
end
By making the time run at 35% speed on X, and making the sizes a bit larger for both as well, we get a cool wandering pattern.
Now that last cart looks pretty cool. But if you look carefully in the bottom-right corner, you might be able to spot a veeery quick glitch where the circle jumps for a tiny fraction of a second.
This bug happens because sin and cos return between -1 and 1, and while drawing a circle at 35 means it shows at 35, and drawing it at 35.8 means it shows at 35, drawing it at 36 means it’ll show at 36.
This is a lot easier to see when we aren’t modifying the numbers, so let’s try this instead:
function _draw()
  st = time()  -- st == scene time
  cls(1)       -- clear the screen to dark blue

  circ(64 + sin(st), 64 + cos(st), 10, 8)  -- draw a red circle
end
See it jumping whenever the circle goes to the bottom? We can stop this by stopping it from ever getting riiight to -1 or to 1. Try this instead, and it should make it more smooth:
function _draw()
  st = time()  -- st == scene time
  cls(1)       -- clear the screen to dark blue

  circ(64 + sin(st)*0.99, 64 + cos(st)*0.99, 10, 8)  -- draw a red circle
end
Even though it’s only a 1% change in the number, it does end up stopping that very quick glitch. If you’re multiplying it by bigger numbers, it’s always worth bringing them back juuuust a little to stop this from happening. For example, instead of sin(st)*30 I’ll usually go sin(st)*29.9, that sort of thing.
If you see any similar numbers, they’ll usually be for the same reason!
Alright, let’s keep extending our first effect. We’ve got our circle spinning in an interesting pattern, taking our last lesson and modifying the numbers a little.
One thing I’ve found really useful in making demoscene effects is making them change over time. The more you can get it to change, the more interesting it is for people to look at, and the longer they’ll keep looking before they get bored!
For now, let’s try something simple – changing the size of the circle along with the position:
function _draw()
  st = time()  -- st == scene time
  cls(1)       -- clear the screen to dark blue

  circ(64 + sin(st*0.35)*29.9, 64 + cos(st)*19.9, 10+sin(st*0.5)*4.9, 8)  -- draw a red circle
end
Taking a look at 10+sin(st*0.5)*5 now, the base size is 10 pixels wide. Every st*0.5 (second, half speed. so every two seconds), it will expand and contract 4.9 (5) more pixels!
Let’s see what this looks like in action:
Pretty nice! Having the different parts of the effect happen at different times (st*0.35, st*0.5, st) helps make it more interesting to look at too.
Alright, now that we’ve got some initials out of the way, and we’ve tried using sin and cos in a real example, let’s move on to making a proper effect!
Pico-8 Scroller
One of the most common effects in demos is the scroller. It’s also a pretty simple effect to implement, so it’s the first one we’re going to try making here.
It’s always nice if you can start with a pretty clear idea of what the effect’ll end up looking like. Here’s a little sketch of what I want to end up with:
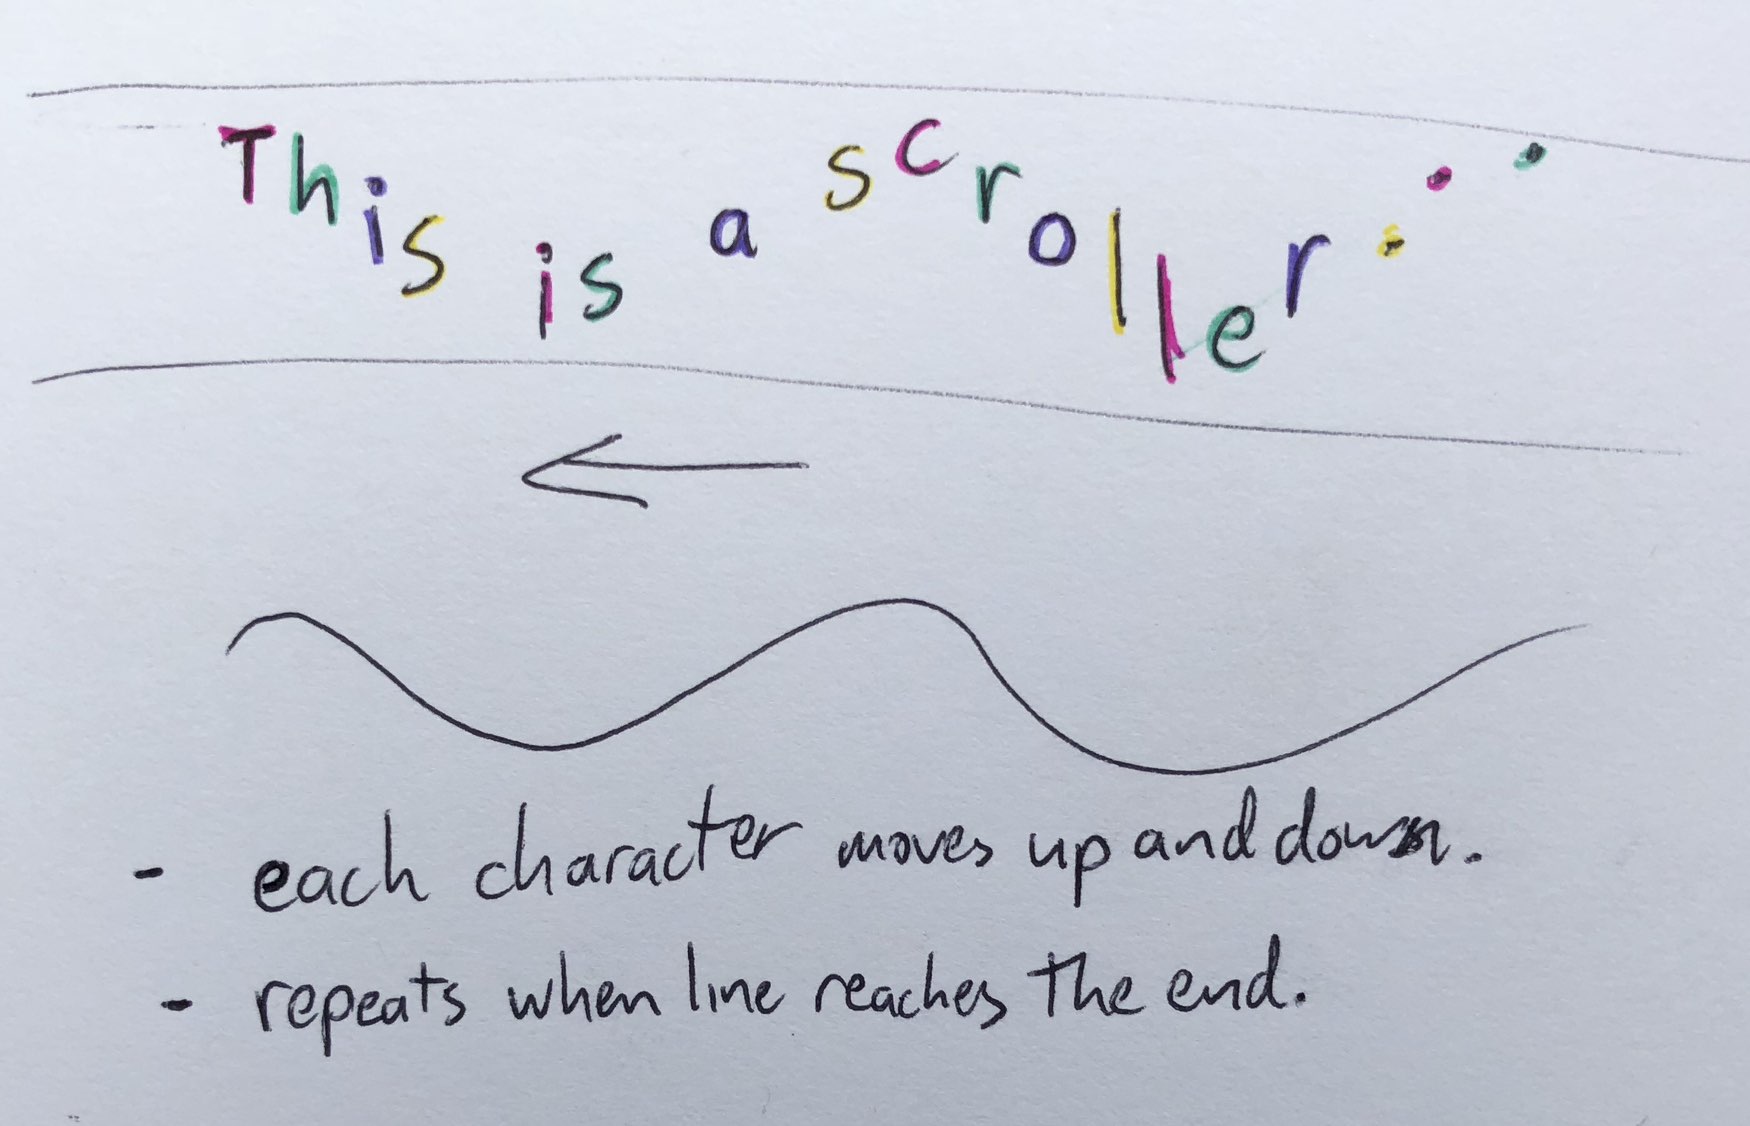
So, a scroller that moves from right to left, with each letter moving up and down separately. And when it reaches the end, the text should repeat and scroll from the right again.
Let’s start off simple, and try making the letters move:
function _draw()
  st = time()  -- st == scene time
  cls(1)       -- clear the screen to dark blue

  print("scrolling the day away!", 5, 62 + sin(st*0.5)*29.9, 8)  -- draw the message
end
So we’ve got a string, and we’re just making it move up and down like we did earlier with the ball! Here’s what you should see:
Now, how do we get the letters to move separately, like in the sketch up there? The fastest way to do it is to draw each letter separately. Let’s take a look at how you can do this:
message = "scrolling the day away!"  -- the message to draw
function _draw()
  st = time()  -- st == scene time
  cls(1)       -- clear the screen to dark blue

  for i = 1, #message, 1 do      -- loop through every letter
    letter = sub(message, i, i)  -- grab this letter
    print(letter, 5 + i*4, 62 + sin(st*0.5)*29.9, 8)  -- draw this letter
  end
end
Now this looks the same as the cart above, but the important thing here is that we’re drawing each letter separately. Now we:
- Have the message as a separate variable up the top.
- Loop through the message and store every letter in a temporary variable.
- Draw each letter after we grab it.
Now that we’re drawing each letter separately, we can modify exactly how we’re drawing it.
When we’re drawing a bunch of letters, lines, or going through some other loop, one of the main ways we modify how it’s drawn is to change the time. If we modify the time for every letter, we’ll change how the sin works its magic.
Let’s try changing the time on every letter:
message = "scrolling the day away!"  -- the message to draw
function _draw()
  st = time()  -- st == scene time
  cls(1)       -- clear the screen to dark blue

  for i = 1, #message, 1 do      -- loop through every letter
    letter = sub(message, i, i)  -- grab this letter
    this_st = st + (0.1 * i)     -- create a modified time for this letter
    print(letter, 5 + i*4, 62 + sin(this_st*0.5)*29.9, 8)  -- draw this letter
  end
end
We always want to leave st alone, so instead we create a new variable this_st with the modified time. We’re modifying the time by going + (0.1 * i), which means that every letter will act like it’s 0.1 seconds ahead of the last one.
For the X, we have (5 + i*4). This means “start it 5px in from the left” and “draw each letter 4px to the right of the last one”. Since Pico-8’s letters are all 3 pixels wide, this means it’ll show them the right amount apart from each other.
Let’s see how it looks!
Awesome!
Now if you look, the letters on the right are leading the movement, and the letters on the left look like they’re just getting dragged along. That’s because the letters on the right are ahead of the previous ones.
If you’d like to make the letters on the left look like they’re leading, simply change this_st to be (st - (0.1 * i)). This means that each letter will be behind the previous one, so the right letters will be getting dragged along instead.
Alright, we’ve got the letters moving, but they’re not really scrolling across the screen. Let’s try that now.
The Pico-8 screen is 128x128 (width and height), so simply drawing everything off the right side of the screen and then bringing it across should work. Let’s give that a shot:
message = "scrolling the day away!"  -- the message to draw
function _draw()
  st = time()  -- st == scene time
  cls(1)       -- clear the screen to dark blue

  for i = 1, #message, 1 do      -- loop through every letter
    letter = sub(message, i, i)  -- grab this letter
    this_st = st - (0.1* i)      -- create a modified time for this letter
    base_x = 130 - st*30         -- where to start drawing the message
    print(letter, base_x + i*4, 62 + sin(this_st*0.5)*29.9, 8)  -- draw this letter
  end
end
Let’s take a look at base_x. (130 - st*30) means “start 130 pixels from the left” (off the right side of the screen), and then bring it to the left by the number of seconds times 30 (if we just used the time, it’d only move one pixel to the left every second, very slow!).
And here’s how it should look:
Alright, awesome! Let’s keep going.
What we’ve got at the moment is good, but we do have the problem that if it reaches the end, that’s it. You can’t see the message anymore. On our little sketch above, we want it to repeat once it gets there, so let’s do that:
message = "scrolling the day away!"  -- the message to draw
x_add = 0  -- extra number to add to the line
function _draw()
  st = time()  -- st == scene time
  cls(1)       -- clear the screen to dark blue

  last_letter_x = (130 + x_add - st*30) + (#message+5) * 4
  if last_letter_x < 0 then
    x_add += 130               -- shift the line right by the screen width
    x_add += (#message+5) * 4  -- shift the line right by the line width
  end

  for i = 1, #message, 1 do       -- loop through every letter
    letter = sub(message, i, i)   -- grab this letter
    this_st = st - (0.1* i)       -- create a modified time for this letter
    base_x = 130 + x_add - st*30  -- where to start drawing the message
    print(letter, base_x + i*4, 62 + sin(this_st*0.5)*29.9, 8)  -- draw this letter
  end
end
Now we have two extra variables, x_add and last_letter_x.
x_add is just an extra amount to shift the line to the right by. If x_add is 20, then the message will be drawn 20 pixels to the right of where it would usually be. We use this to shift the line to the right when we need to repeat it.
last_letter_x is where the last letter in the message will be drawn. We have (130 + x_add - st*30), or just the normal letter x calculation, plus ((#message+5) * 4), or the number of letters in the line, plus five (for some padding), multiplied by 4 (the width of each letter).
After calculating where the last letter should be, we check whether it’s off the left hand side of the screen. If it is, we shift the line to the right by the screen width, and then by the width of the line itself!
Let’s see how that ends up looking:
Awesome, repeats just like we want it to! Next, let’s move on to the colour pattern.
If we look back at our sketch, we can see that it goes through the colours red, green, blue, and yellow – and it repeats. Pico-8 has 16 colours, which are laid out here. In short:
00 01 02 03 04 05 06 07 08 09 10 11 12 13 14 15
So our pattern will be: 08 11 12 10
Let’s take a look at how we can do that:
message = "scrolling the day away!"  -- the message to draw
colours = {8, 11, 12, 10}  -- colours to draw the letters
x_add = 0  -- extra number to add to the line
function _draw()
  st = time()  -- st == scene time
  cls(1)       -- clear the screen to dark blue

  last_letter_x = (130 + x_add - st*30) + (#message+5) * 4
  if last_letter_x < 0 then
    x_add += 130               -- shift the line right by the screen width
    x_add += (#message+5) * 4  -- shift the line right by the line width
  end

  col_index = 1  -- which colour from the pattern to draw
  for i = 1, #message, 1 do       -- loop through every letter
    letter = sub(message, i, i)   -- grab this letter
    this_st = st - (0.1* i)       -- create a modified time for this letter
    base_x = 130 + x_add - st*30  -- where to start drawing the message
    print(letter, base_x + i*4, 62 + sin(this_st*0.5)*29.9, colours[col_index])  -- draw this letter

    -- only go to the next colour
    -- for actual letters, ignore
    -- spaces!
    if letter != " " then
      col_index += 1 -- next colour
      if #colours < col_index then
        -- if we're at the end,
        -- go back to the first
        -- colour in our pattern
        col_index = 1
      end
    end
  end
end
So, the changes we’ve made:
- We now have a
colourslist at the start, holding the colours we’re drawing. - We have
col_index, which points to which colour in the list to draw. - If a space gets drawn, don’t do anything.
- If anything else gets drawn, draw it with the colour (
colours[col_index]), then move to the next colour in the list. And go back to the first colour if we reach the end.
Let’s see how it ends up looking:
Great, exactly what we want! Now our scroller effect’s complete.
This is where I’d usually rename the variables to be a bit more specific (maybe instead of message I’d use scroller_message, same thing for colours). Having more specific names will make it easier to use it alongside another effect later.
Now, let’s make a new effect!
Pico-8 Plasma
So, where a scroller uses sin and cos to affect the position of the text, plasmas use sin and cos to affect the colour of different parts of the screen.
When you plug a number into sin, the output goes from 0 to 1. For example, if you plug time() into sin, the output goes from high to low, high to low, and repeats infinitely.
Here’s a pretty simple starting point that we can look at:
function _draw()
  -- put the background colour into bg_colour
  bg_colour = sin(time()) + 1

  -- draw bg_colour over the whole screen
  cls(bg_colour)
end
The main part for us to focus on is the bg_colour = sin(time()) + 1.
sin(time())means to continue moving from-1to+1, based ontime(). Every second or so, the output number will be:-1, -0.5, 0, +0.5, +1, +0.5, 0, -0.5, -1and all the numbers between them, repeating again and again.+ 1just raises the sin, so that instead of being-1to+1, it’s0to+2.
When the output of that is passed in as a colour, it’s floor()‘ed (0.5 is turned into 0, 1.8 is turned into 1, etc) to give the output colour. Looking at the Pico-8 colours, we should see it go from black [0] to dark blue [1] to purple [2], right? Let’s take a look:
We’ve got something, but it’s not quite what we’re expecting. It’s only going between 00 and 01 and totally skipping 02
Well, that’s because of the automatic floor() that gets done before bg_colour is used! Because bg_colour gets run through that floor function, it will only be 02 if it’s exactly, or more than, 2.0. Because bg_colour is only 2.0 for the tiniest amount of time (small enough that the display doesn’t even capture it), it’s totally skipped over.
Let’s try actually making a few different colours.
~~~ work in progress ~~~